Blind Control V6 Install and Upgrade


#1

Blind Control [V6.06 Bin file] latest as of 7th Nov 2020
Dropbox. (click link).

Upgrading to this version from previous versions will force control module to reset into AP mode as there were large changes in software.

Note the default admin ID and password are id = admin and password = password.
you can change the password in GUI

You then need to connect via AP and set up new. Enter WiFi and MQTT details ONLY.
All other configuration options are now done via new GUI after .
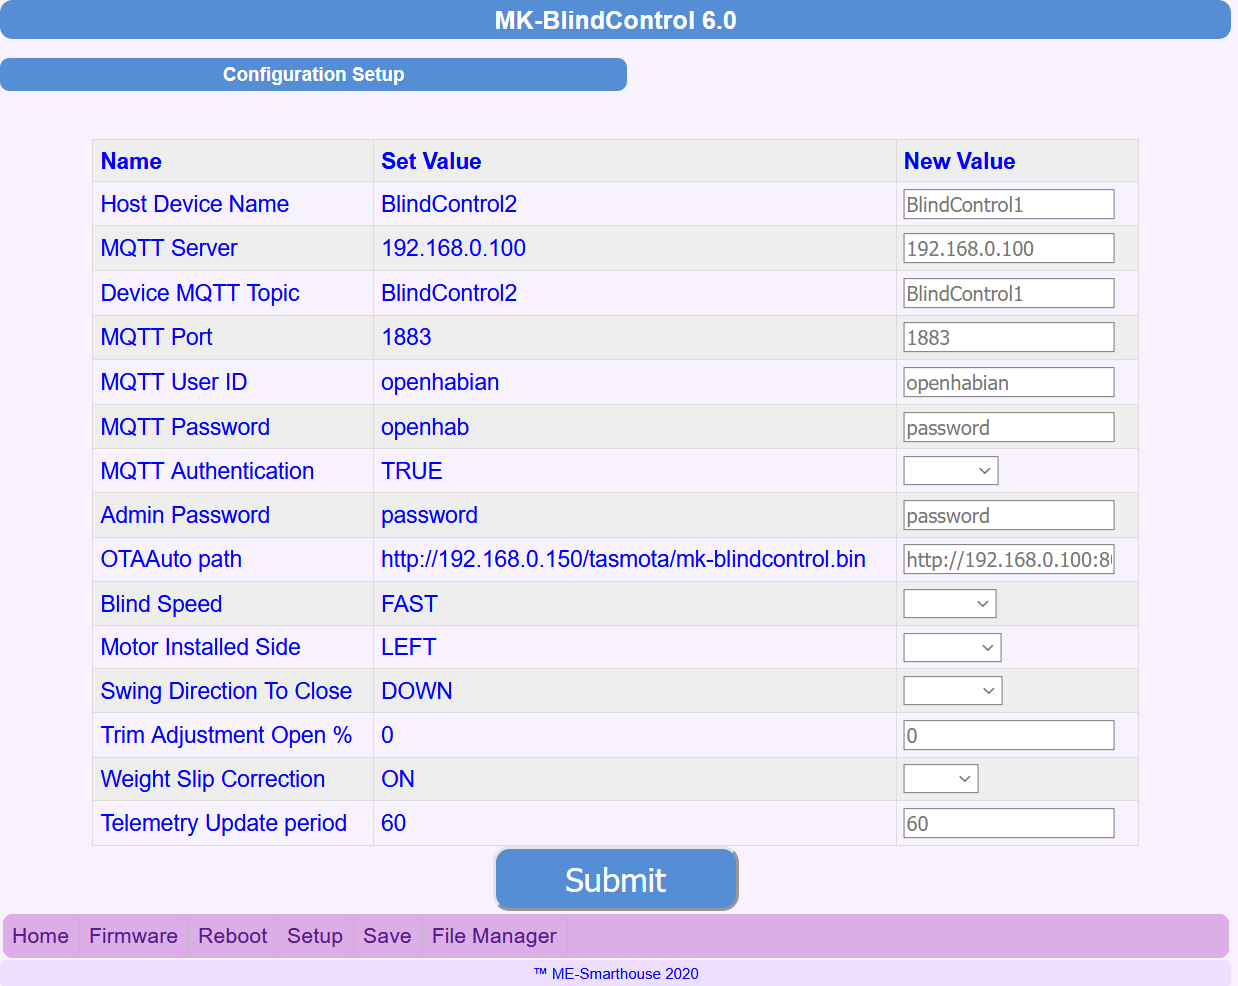
Once the device has reboot you need to connect to the device via its IP address in a web browser , eg 162.168.0.45, you will be presented a status and config web page
were you enter TOPIC details, admin password change, blinds speed and direction , the side blind motor installed, trim adjustments , OTA remote upgrade path, etc

This new GUI also allows file upload and down load and RESET options

New Features in V6

  1. JSON state and telemetry output

  2. LWT online/offline status

  3. Telemetry update period

  4. Remote OTA upgrade via MQTT command (Tasmota command option)

  5. New GUI for configuration and status

  6. File Manager, upload down load options

  7. Option for wired push button using existing terminals .ie. PGM RUN jumper pins

  8. Follows Tasmota style of format and control

JSON TELEMETRY OUTPUT sample

{“Device”:“BlindControl2”,“ServoPos”:180,“POWER”:100,“cmnd”:“100”,“SPEED”:“FAST”,“Wifi”:{“AP”:“MK-BlindsControl-V6-7230271”,“SSId”:“SmarthomeSAT_IoT”,“MAC”:“80:7D:3A:6E:53:3F”,“Channel”:11,“RSSI”:100,“Signal”:-44}

Accessing Device Home Status Screen via web browser. e.g 192.168.0.50

Select Setup menu option to configure other settings

Add or create new things file in Openhab. mk-blindcontrol.things

Bridge mqtt:broker:mosquitto “Mosquitto” [ host=“192.168.0.100”, port=1883, secure=false, username=“openhabian”, password=“openhab”, clientID=“openHAB2” ]{

//Kitchen Window
Thing topic MK-BlindControl1 “MK-BlindControl-1” @ “Kitchen” {
Channels:
Type string : reachable “Reachable” [ stateTopic=“tele/BlindControl1/LWT” ]
Type dimmer : power “Power” [ stateTopic=“stat/BlindControl1/STATE”, commandTopic=“cmnd/BlindControl1/POWER” ]
Type string : speed “Speed” [ stateTopic=“stat/BlindControl1/SPEED”, commandTopic=“cmnd/BlindControl1/SPEED” ]
Type number : rssi “WiFi Signal Strength” [ stateTopic=“tele/BlindControl1/STATE”, transformationPattern=“JSONPATH:$.Wifi.RSSI” ]

}

}

Save File

Add the following to *.items (same of items file ir create new eg mk-blindcontrol.items

//Back Door Blind

Dimmer Blind_Kitchen “Kitchen Blind [%s]” (GF_Kitchen, Blinds, RollerBlind, G_Restore) { autoupdate=“false”, alexa=“Lighting”, ga=“Light” }
String Blind_Kitchen_Reachable “Kitchen Blind " (LWT)
String Blind_Kitchen_Speed “Kitchen Speed” (GF_Kitchen, Blinds, RollerBlind, G_Restore) { autoupdate=“false”, alexa=“Lighting”, ga=“Light” }
Number Kitchen_rssi Kitchen Blind [%d %%]” (RSSI)

save file.

the (GF_Kitchen, Blinds, RollerBlind, G_Restore) are my own groups , adjust to suite your design. Also have added alexa and google TAGS

Now you need to access PAPUI in openhab and link things to the items

Add the following to your sitemap

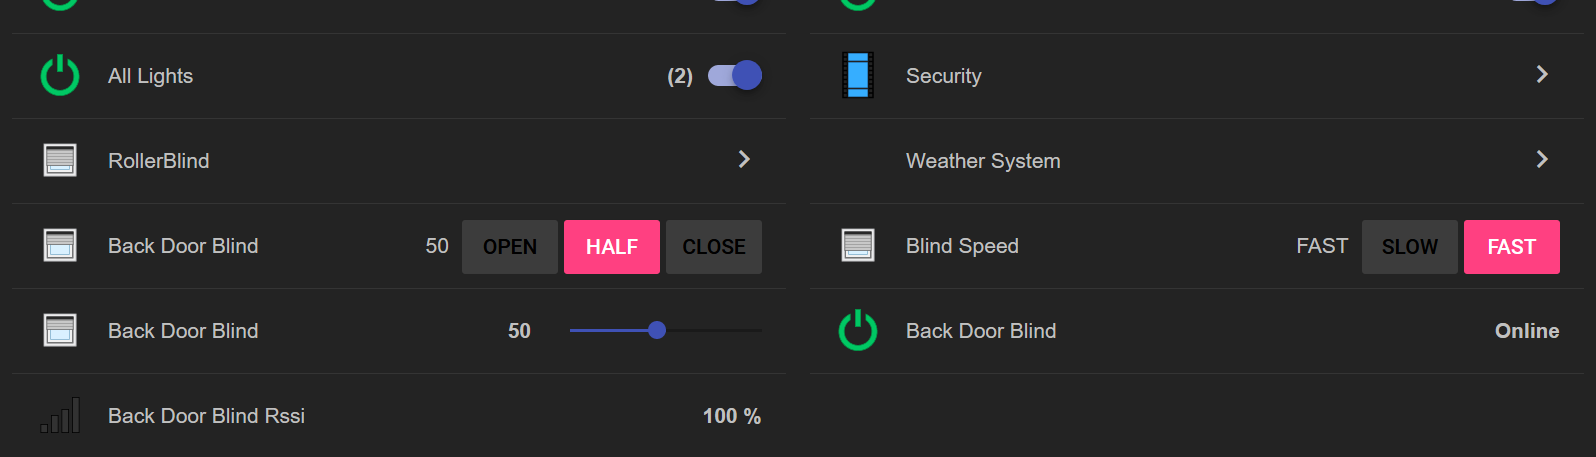
Switch item=Blind_Kitchen label=“Door” icon=“rollershutter” mappings=[0=“Open”, 50=“Half”, 100=“Close”]
Switch item=Blind_Kitchen_Speed label=“Blind Speed” icon=“rollershutter” mappings=[SLOW=“SLOW”, FAST=“FAST”]

Sample BASIC UI showing only Control and speed selection. Other settings as Online, WiFi and siginal strength etc


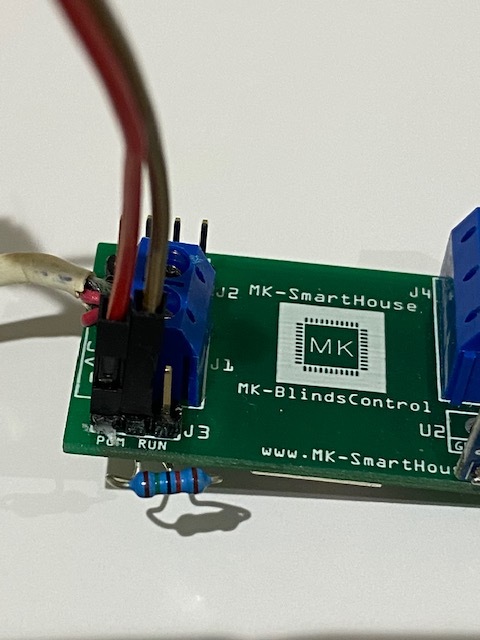
WIRED PUSH BUTTON OPTION
Need to solder a 10k resistor between the centre pin and RUN on the under side of PCB

Connect momentary push button switch to centre pin and PGM pin on the top side of PCB

Install the switch were you would like, external to the blind or internal, I installed internal in the space left by the removal of the open/close wand mechanism

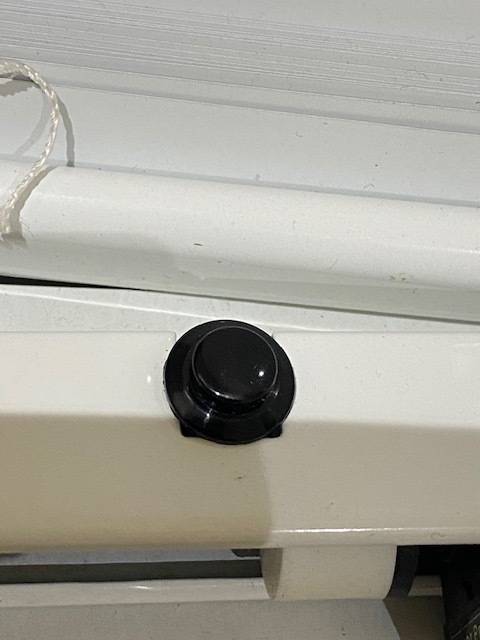
This switch will toggle open and close (50% option not implemented yet).

Also switch is used in the reset cycle if need by holding down on power reboot for 10 seconds.

Note: debounce is done via software control , no extra components needed like capacitor/resistor

COMMANDS and MQTT Control
The new firmware has 2 TOPICS its connects too.
tasmota global cmnd/tasmota/ plus control topi
MQTT TOPIC cmnd/MQTT_Topic/ plus control topic

In this example I will use blindcontrol1 as my Device ID and MQTT_TOPIC

To set the servo motor to OPEN position before connecting to blind shaft.
**http://deviceipaddress/set-servo e.g. http://192.168.0.49/set-servo

To Restart use the following.

**http://deviceipaddress/reboot e.g. http://192.168.0.69/reboot

Via MQTT
**cmnd/MQTT_Topic/Restart e.g. cmnd/blindcontrol1/Restart Payload = 1

To Reset Device and erase all configs (Password protected)

**http://deviceipaddress/reset e.g. http://192.168.0.69/reset

To change the SPEED via MQTT

cmnd/MQTT_TOPIC/SPEED Payload SLOW or FAST
eg. cmnd/blindcontrol1/SPEED Payload SLOW

To Control blind
cmnd/MQTT_TOPIC/POWER payload

0, 1, OPEN, CLOSE, ON , OFF and percentage 0-100

To Remote upgrade VIA OTA server

MQTT ONLY

cmnd/MQTT_TOPIC/upgrade payload = 1
e.g. cmnd/blindcontrol1/upgrade 1


#2

Already using it, slick…


#3

Also like the state JSON, very usable.


#4

This is great! Thanks Mountain!!


#5

I would like to try this. Could you please post a new link? Thanks!!!

image


#6

Have re added link above in original post. This one does not expire.


#7
 Thank You!!!!   Playing with it now

#8

Hi Mountain, is there an option to stop broadcasting the blind’s SSID? I have a bunch, they’re all setup but still broadcasting all their SSID’s. Thanks.


#9

I’ll check it out in the next few days, a lot of the libraries were upgraded in this build.
Thanks for pointing this error out. It should not be doing this.


#10

Playing with this release now. This is fantastic. I am going to solder on a push button this weekend and test that. Thanks @Mountain


#11

I am implementing newer code for multiple button operation.

  1. Click: rapid press and release . Open blind
  2. Double-Click: two clicks in quick succession. Close blind
  3. Press and Hold: holding the button down 2 sec then release . Open blind to 50%
  4. Long Press and Hold: holding the button for a long time 6 seconds. Reset Controller to default wipe all data and launch AP mode.

Should have this up for release shortly. Currently testing code. And removing a couple of bugs.

New firmware. 6.05

Remote switch control improvements

1 short press. toggle open/close

double press fast. move blind to 50%

Long press 5 sec plus. Reset Device, wipe all data Restart AP setup mode

Re download firmware from original post.

This version is beta. Next release will have smart control enabled in remote switch operation. such as slip correction, trim offset etc. these are currently available in MQTT operation ONLY.

Please try beta version…


#12

Have fixed the SSID broadcast issue. Was in the Upgrade of WiFiManager 2 Alpha release. Have down graded to .15 stable release and broadcast has gone. All options are still working.
Have replaced the bin file as in original post.

Will release new version with smart control options enabled in the next few days.
Hope this will help.
Thanks for the feedback


#13

I have one board / motor I’m testing with 6.05. not installed in a blind yet. Is there an issue with it randomly resetting or moving the motor?

It’s sitting on my desk and every so often I’ll hear the servo buzz.

I do have the resistor and switch installed and that functions correctly, as well as it’s responding to all the correct MQTT Topics so I think its working fine… it just randomly opens or closes a bit.


#14

It should not buzz or move…if it restarts due to wifi or power problems then you will get a slight movement. Servo needs to obtain its location, also software will move blind to its last position on reboot…(I can disable this but positioning information will be incorrect on habpanel etc )Position information is stored in a dat file that is created on 1st received commands via mqtt.

Check you have good power supply. I use a 2A-3A plug …

also check wifi is good strength…
On powerup servo will jolt .
after connection to wifi and mqtt software will restore servo to last stored location will get another jolt.

Have downloaded the latest v6 as i not long upgraded to 6.06
I had issues on the bench before aswell


#15

Hi, Im wanting to upgrade. I believe I have V5.
But I cannot for the life of me remember how…
I have not been able to directly access the IP address, is there something im missing?


#16

You need to be able to access th device by its ip address.
example 192.168.0.40 would bring up a status page.
this will also give help information on how to upgrade firmware.
You need to findout what ip the blind controller has. You might need to go into your router to find out that information.

One you have the IP address, from your browser
Deviceipaddress/upgrade
example
192.168.0.40/upgrade
You will be prompted for id and password, that you set up on 1st configuration, the admin id and password.

Then you be locate the bin file to upload.
Select the downloaded file of v6
Once upgrade you will need to reconfigure via AP mode again as a new install
This is required as V6 has a memory and file management upgrade…Major change


#17

Hi @Mountain, thanks for that.
A quick reboot allowed me to access the web ui, I could originally see the devices connected to my router and was able to control them via mqtt but for some reason just couldn’t access them via ip…

I have upgraded one of my blinds to V6 but am having issues getting it to connect to my network.
Post entering my credentials in AP mode it would just never connect to my network and kept broadcasting its SSID “MK-smartV6” (or something along those lines) it certainly wasn’t what I set it to.
The SSID and PW I entered were certainly correct, I tried approx 10 or more times.
I did at one point try to enter the credentials but not input any MQTT info and it connected but as soon as I went through the new web ui and entered all my MQTT credentials I lost the device again…

Is there something im missing/could be doing wrong? Through all of this I have also tried to reset the device multiple times by moving the jumper but it seems whenever I reconnect the MQTT credentials etc are still there which I thought would disappear? Only thing I haven’t tried is to refresh via serial if you think its a good idea?

Thanks in advance - Anthony


#18

I had the same problem during A Upgrade and Reset…Tried several times, took 2 days to see the problem and fix
Bug with wifi manager…

Symptom
When you connect to Device via AP mode you will probably see the SSID field already filled in with your SSID and all other fields left blank, like SSID password and MQTT details etc.
I just entered the SSID password and all MQTT details etc then saved.
Device kept appearing as AP mode. etc

Fix
When connectiong in AP mode I noticed the SSID field was refilled again and its was a gray or lighter text colour, I then selected the SSID from the above list using mouse etc and the value became a darker colour, I then procedded to enter SSID password and all the MQTT details etc then hit save.
This fixed it.
It appears the reset settings in WiFi Manager has problems clearing the SSID name in EEPROM .

Note . When the device goes into AP mode the SSID broadcasted will be MK-SmarthomeV6.nnnnn , this should go once the device is configured correctly.

Also Admin id and password is set to default, but you can change password in GUI now
ID = admin
Password = password

Try this above before reflashing via serial this would be last resort and a pain aswell

Note on GUI

If you make changes via GUI and press commit make sure you press save as well.
Commit only changes the values in memory not stored, Save stores the values.

Also you must enter MQTT details in AP mode…The GUI only alows you to change once configured. If you leave these fields blank in 1 st config AP mode the device will keep restarting into AP mode.
All fields in AP WiFi Manager configuration Mode need to be filled in…


#19

Thanks, managed to get it working but don’t feel like I did anything different.

Just made sure I went through and deleted and retyped everything.

One question re make changes in the ui, do you have to fill out all the boxes each time you make a change ie I only want to change speed from FAST to SLOW would I also have to fill the Host device name new value again?


#20

Only what you change in the GUI, The fields on the right are either blank or have a gray example format, these are null untill you update that field. You only need to change the field/option you want. eg Speed SLOW or FAST.

you can also send a MQTT command to change speed too.
cmnd/TOPIC/SPEED payload FAST or SLOW

eg cmnd/BlindControl2/SPEED SLOW

or via switch function in site map…